Comment

Sports Composite Team Photo

Fairport Boys Varsity Basketball team composite photo

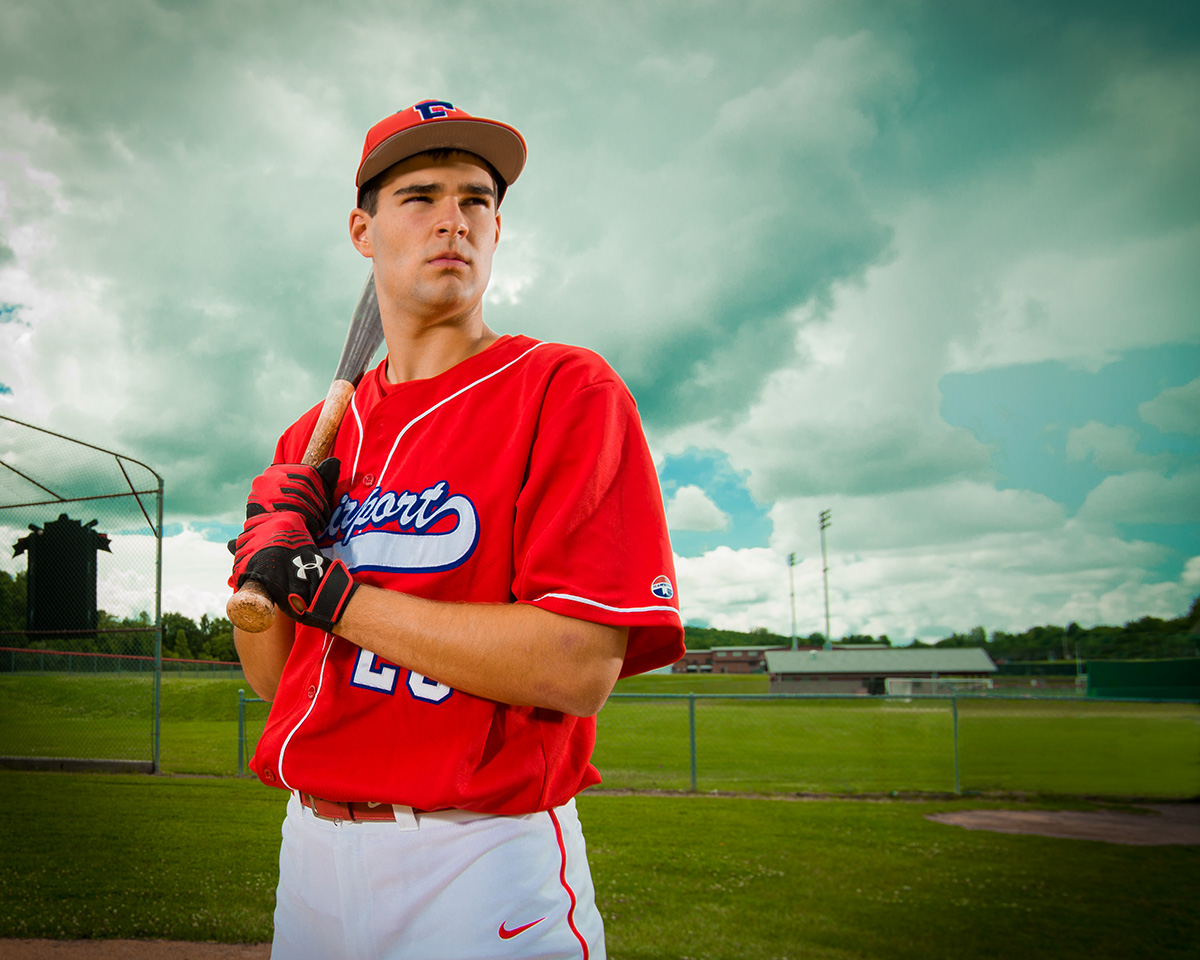
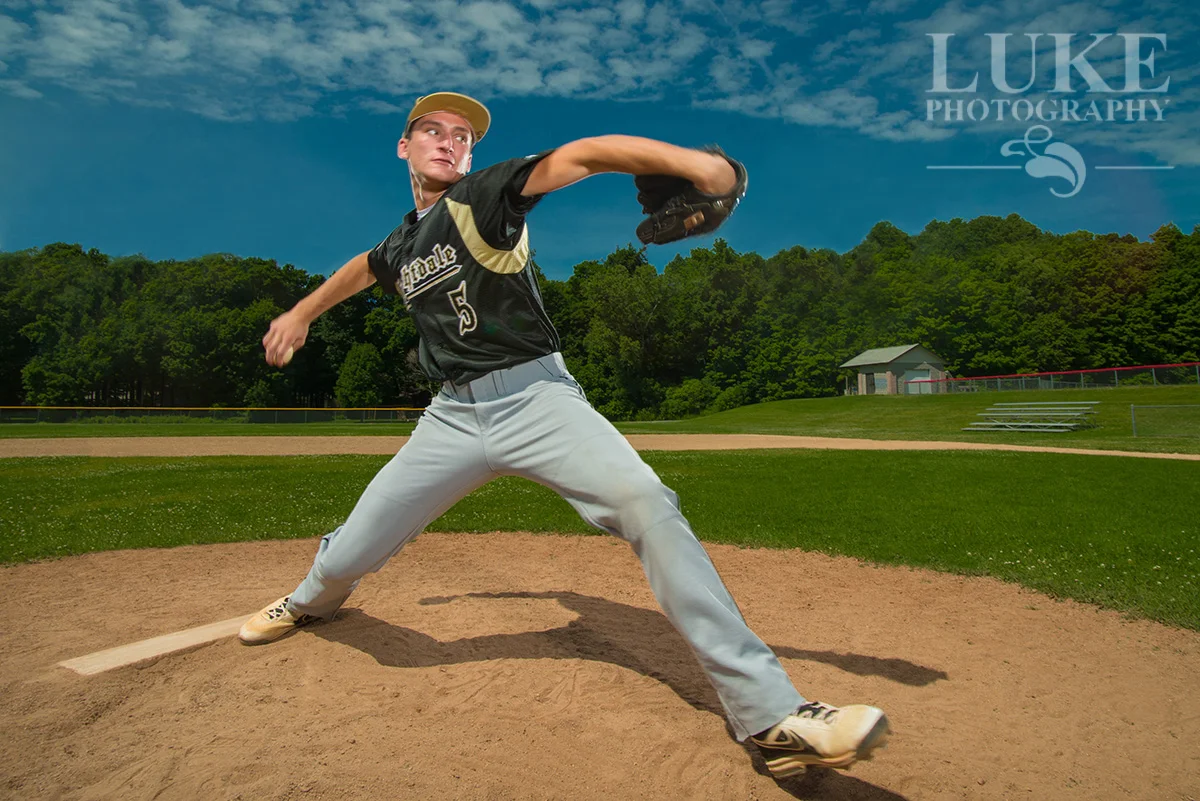
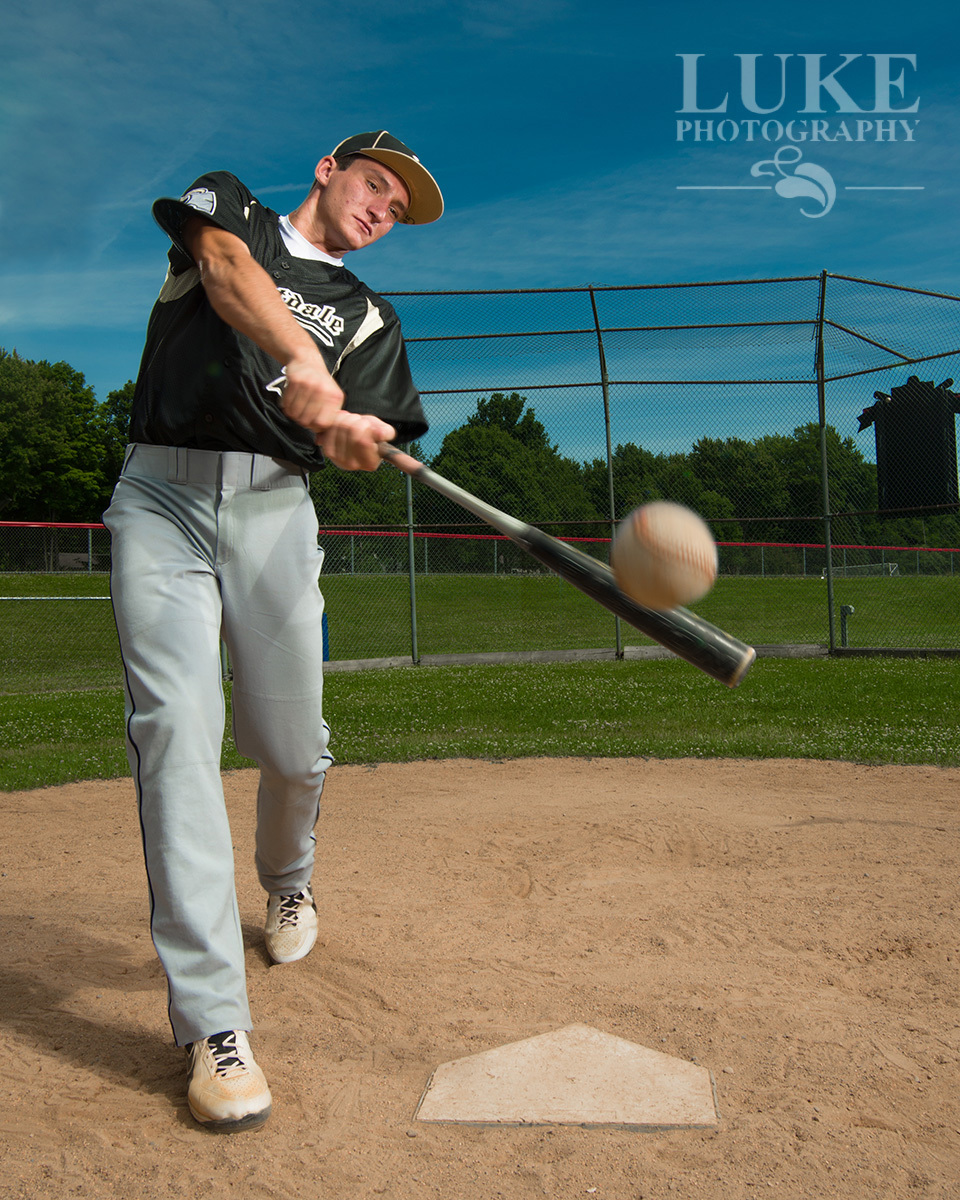
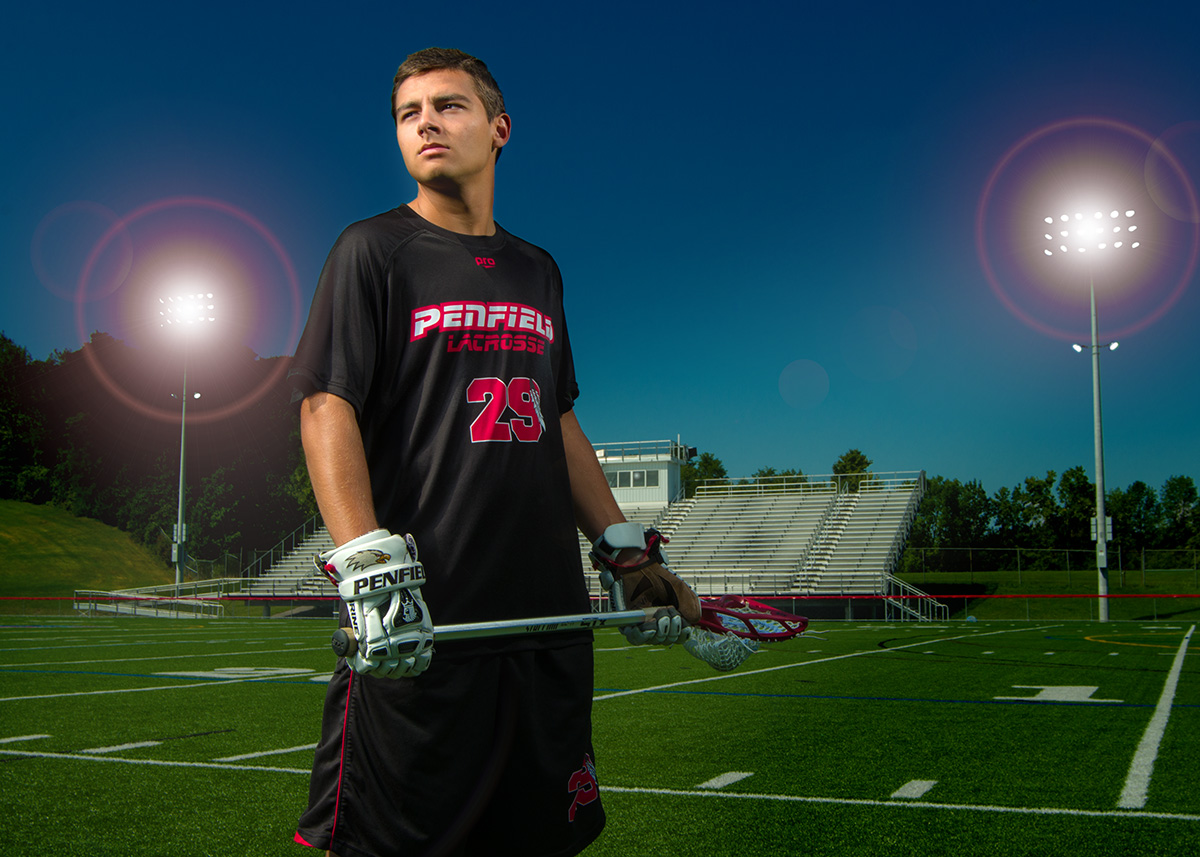
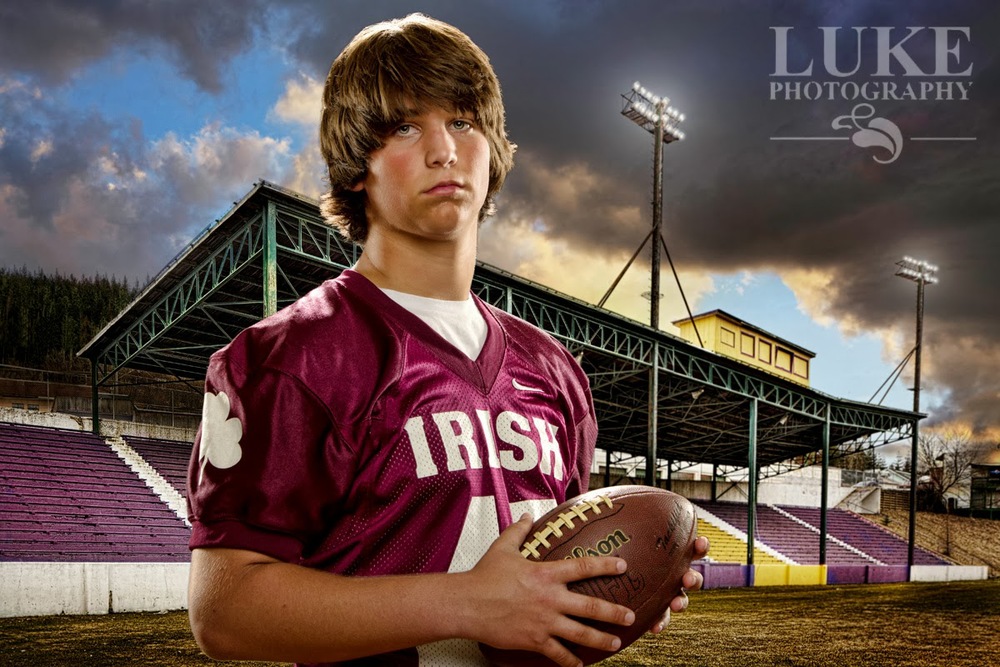
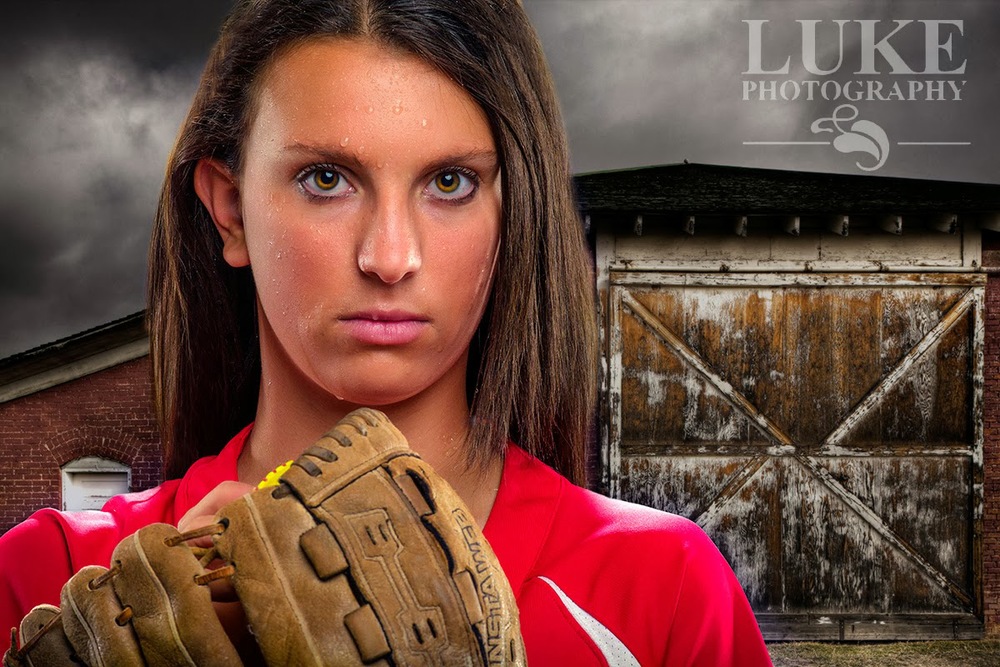
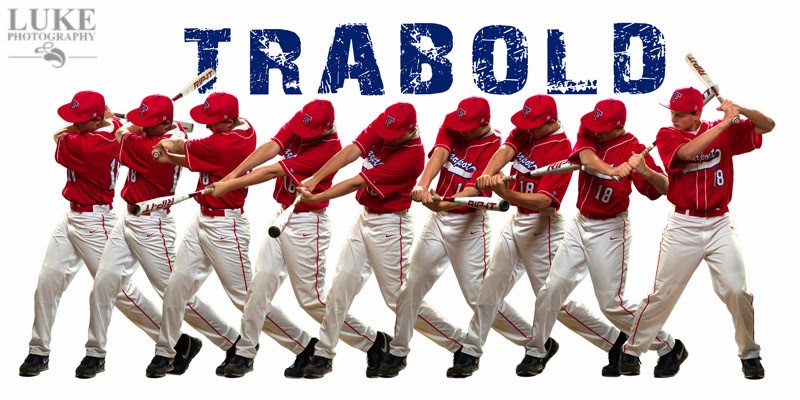
Here at Luke Photography, many of the sports team photos that I do in Fairport and the Rochester area involve creating composite team photos.  I prefer this rather than the traditional team photos because, well, it's not traditional.  I want people to stop and look at the team photos and study them because they're different.

Does it take longer to do?  Certainly.  
Then why do I do it?  The first reason has already been stated: they look different.  
Why do they look different?  It all has to do with the lighting.

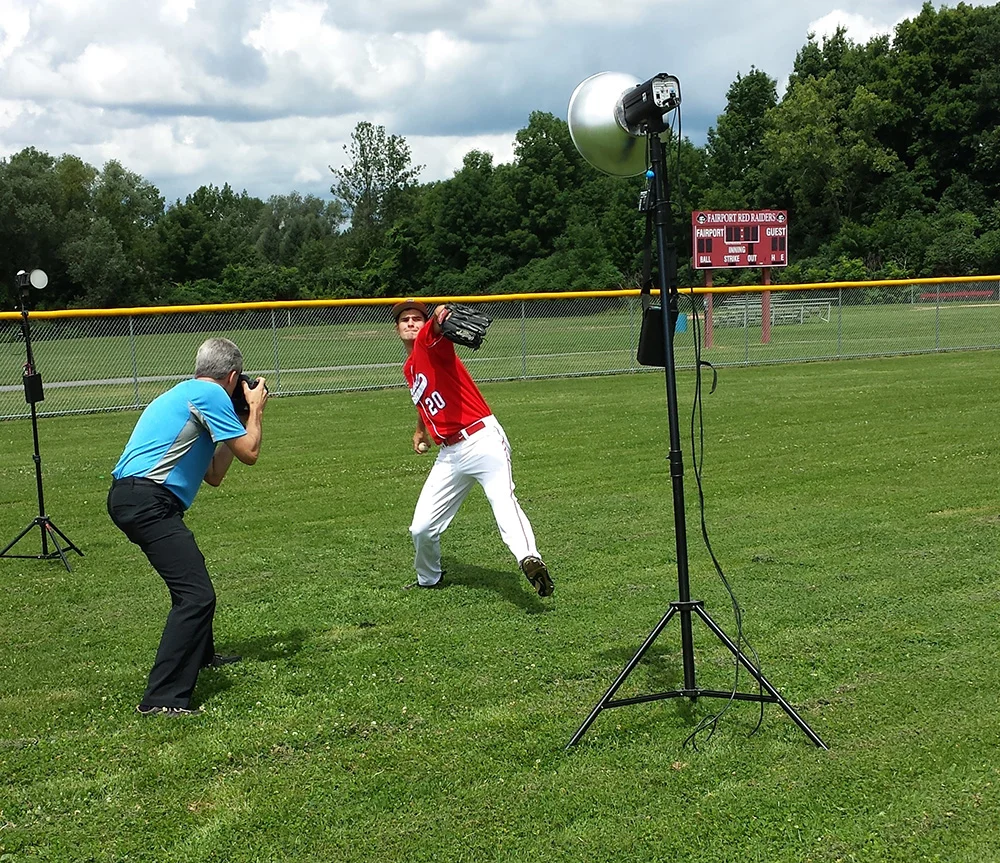
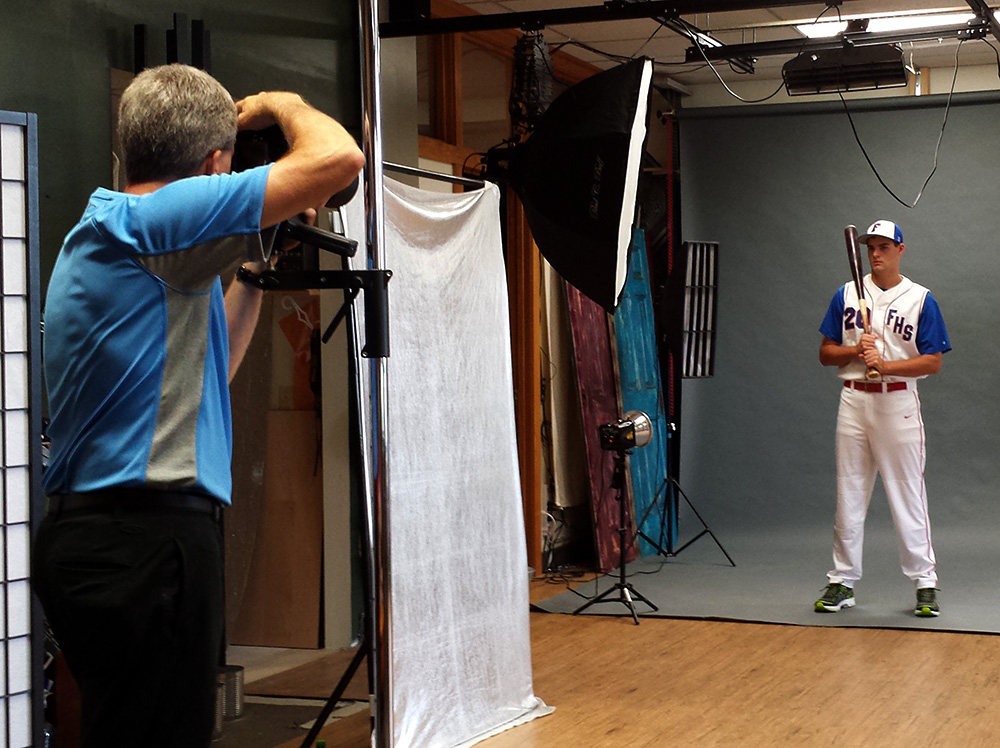
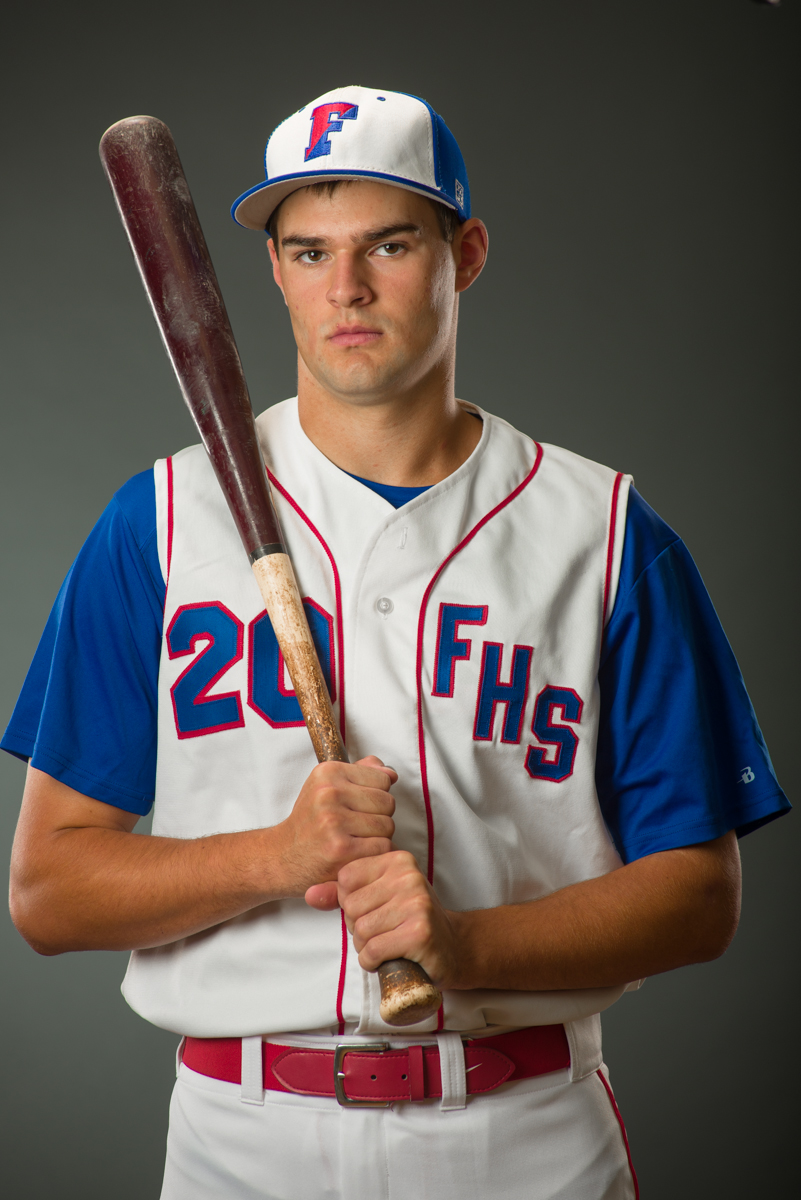
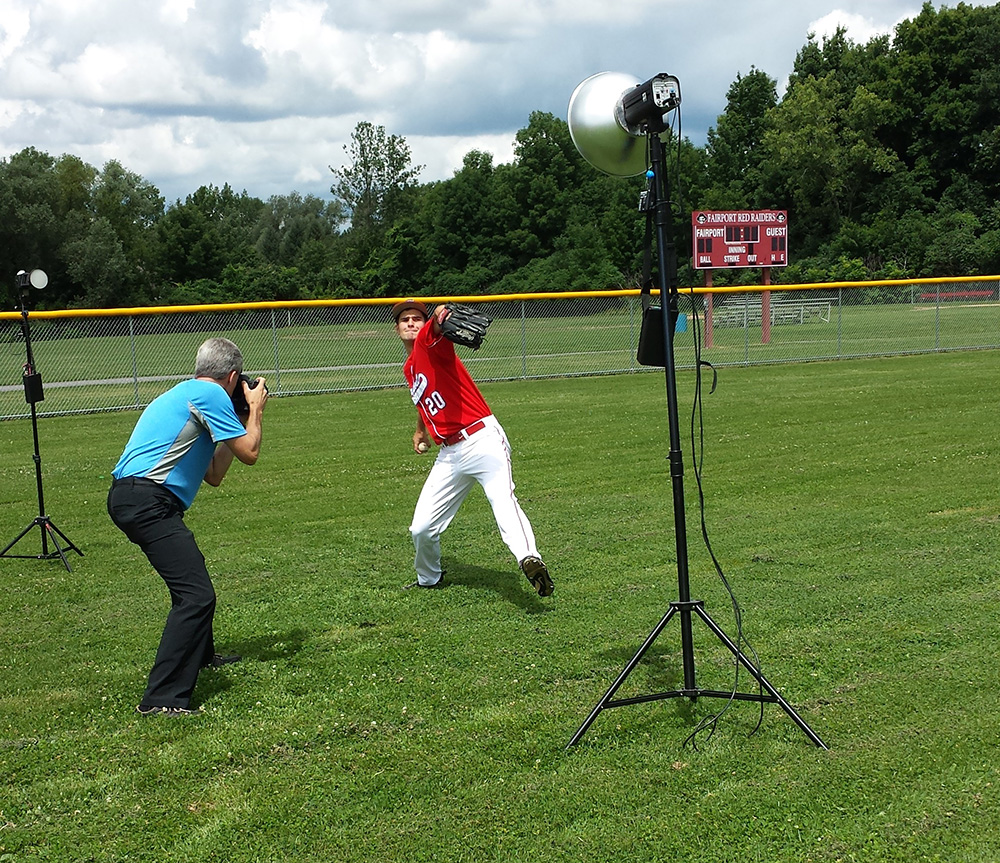
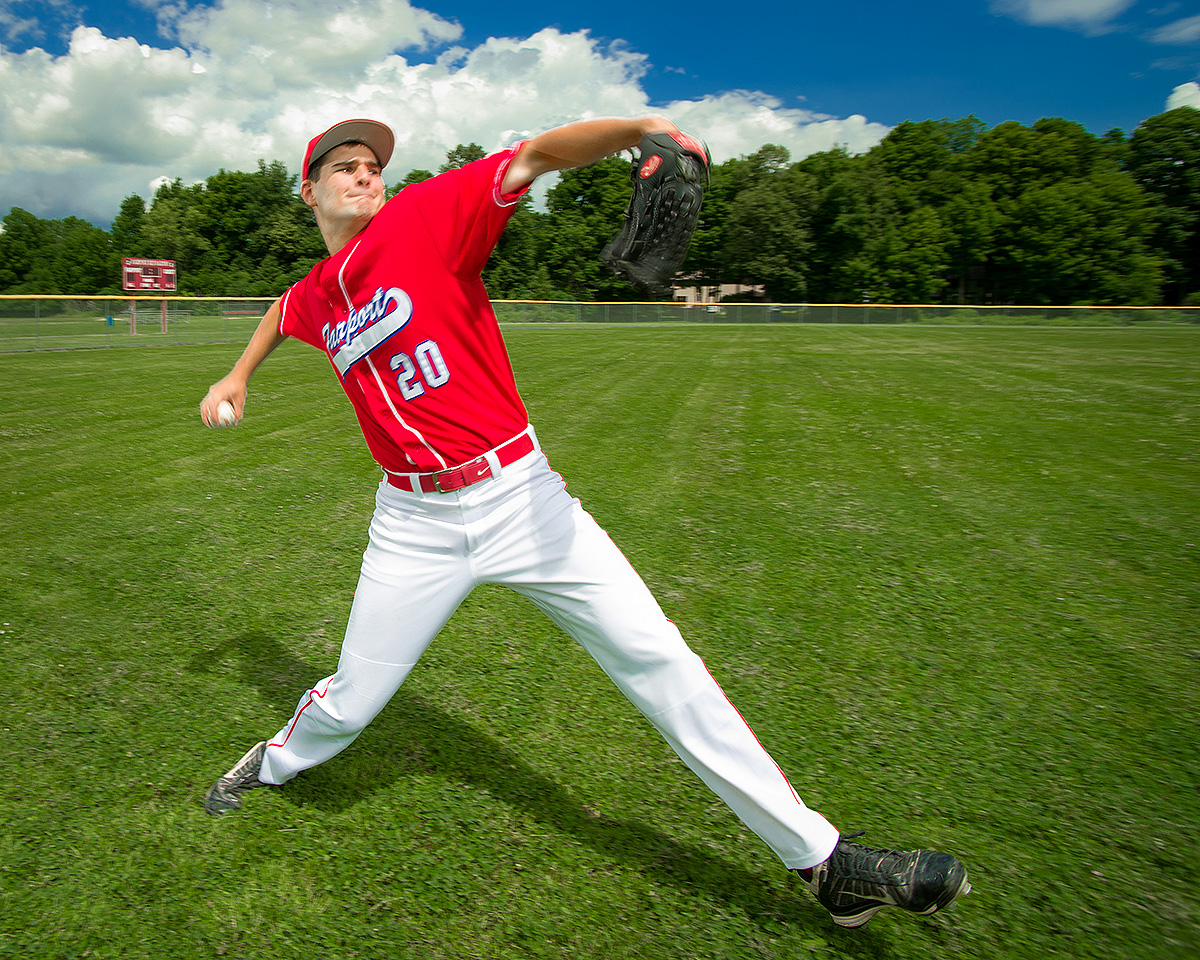
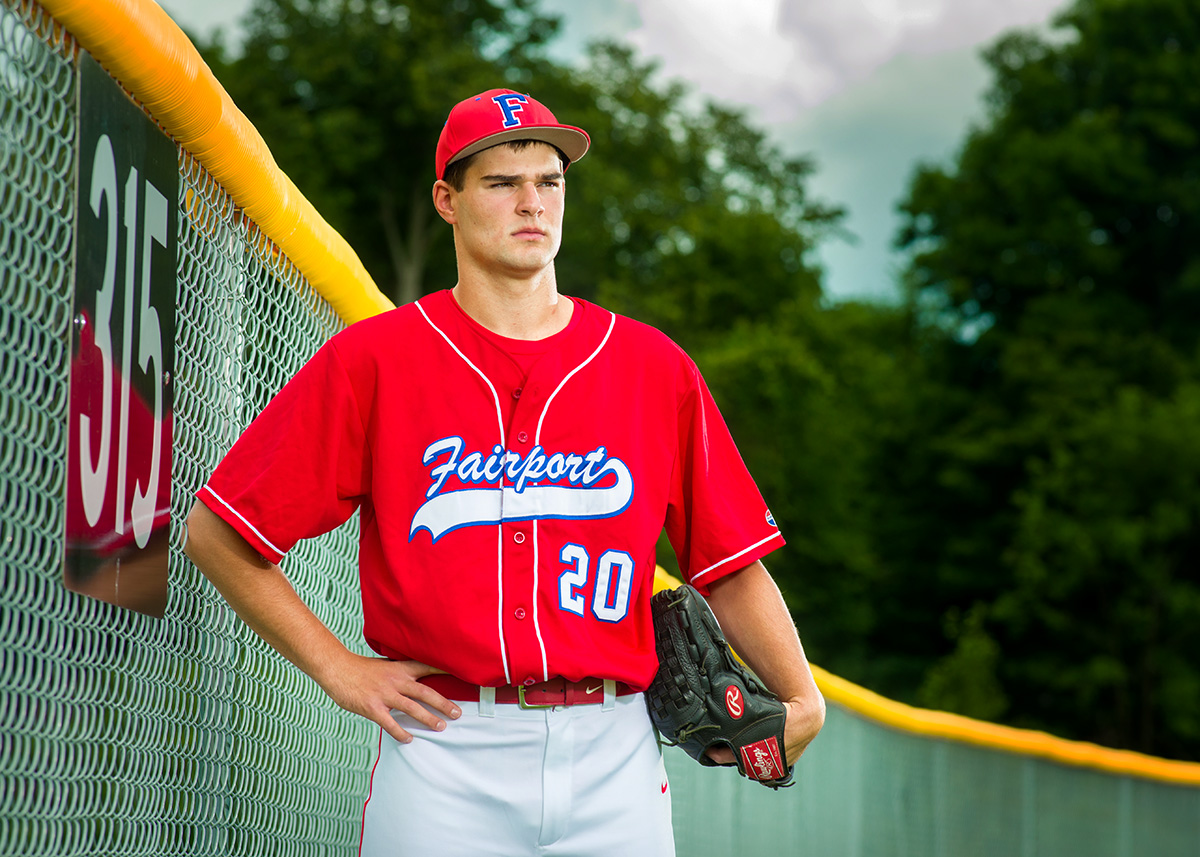
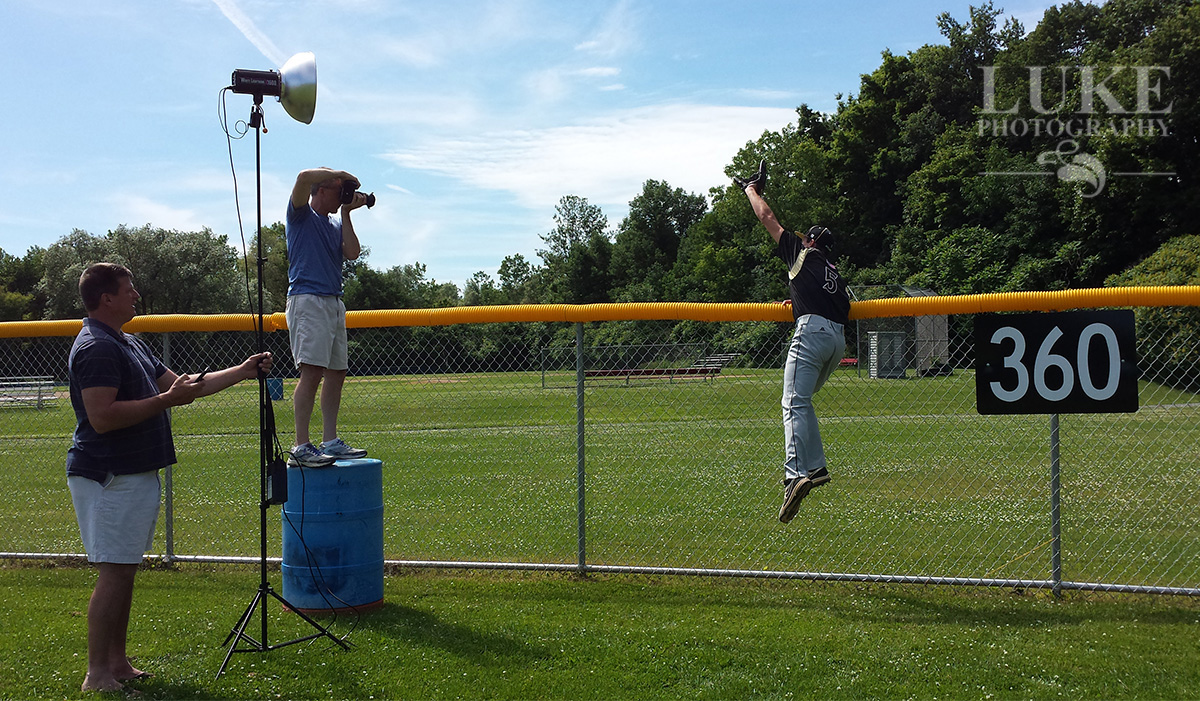
By photographing each athlete individually, I can make sure the light is perfect on each and every one of them.  I can also pick the best pose for each athlete, as I take a couple of photos of each of them, and pick the one that will fit into the team composite the best. The backgrounds are then stripped out and I begin building the team photo.


There is a saying that the devil is in the details.  Nowhere is it more true than when doing these composites.  If you don't create realistic shadows between players, shadows under their feet where they meet the floor, and reflections on the glossy gym floor, it will look very two-dimensional and fake, and it will be obvious what you've done, because it looks like the players were cut out with scissors and pasted on the paper.  The biggest compliment I get is when people cannot tell between my composites and the traditional team photos that I do.

Final Product: Fairport Boys Basketball  team schedule

Here is a time-lapse video of the entire process, from setting up the lights to building the composite:

http://youtu.be/GTG7zDi8A7I


Comment

How To Get Your Customers to Love You

Comment

How To Get Your Customers to Love You

Luke Photography - Customers Loving You

As any small business owner will tell you, our customers are the lifeblood of our business. Ensuring brand loyalty is crucial to our survival.  Because there are so many photographers flooding the market with business cards now that digital cameras seem to do everything for you, getting customers is a difficult proposition.  But once you have them, keeping them is the name of the game.

There is a long-standing "80/20" business adage that indicates that 80 percent of your business comes from 20 percent of your customers, meaning that the majority of your business comes from repeat customers.  In the world of photography I'm not not sure that these figures are entirely true, but let's focus on what you can do to not only keep the customers that you have, but make them your biggest ambassadors and shout from the rooftops....or from social media sites....how good you are.

  1. Send a Thank You Card - I always try to send out thank you cards shortly after my customers walk out the door with their orders.  I have a box of blank note cards, and it only takes a few minutes to write a short note thanking them, knowing that they could have spent their hard-earned money elsewhere. Yes it takes longer than a quick e-mail, but that's the point.  I include some personal comments about their order or something that happened during the session to make it personal, and that makes them stand out.
  2. Pay Attention To Them - When you are with your customers, they should have all of your attention.  Don't be answering phone calls or text messages. By diverting your attention, you are saying is that whoever is on the end of the line is more important at this time.  The people that are standing in front of you are more important than anyone, and you are now wasting their time.  If the phone call is important, you can return the voice mail....and a text message you can answer any time.  Has anyone ever done that to you?  How unimportant did it make you feel?
  3. Celebrate Their Victories and Suffer With Them - I pay attention to the local newspapers and social media, and when I learn that a student athlete had a big game, or someone had a birth or death in the family, I reach out to them.  It doesn't have to be much, but show them that you noticed, and that you care.  And it helps if you really do care....phony sentiments will bury you.  And do this as yourself, not your business; your'e not selling anything here.  I'll even send birthday wishes and graduation congratulations along.
  4. Pay It Forward - Karma almost always pays off.  Find ways to talk about your customers to other people.  If your customers are business owners, do what you can to talk about them and push business their way. After all, they've done the same thing for you, why not return the favor?
  5. Always Be Positive - Yeah, sometimes life can be a B-word.  Don't burden your customers with your issues...we've all got them.  I concentrate on asking questions, not making statements.  I'd rather know about their day and what's going on with their family.  They don't need to know about my aches and pains.

I always said my business was going to be about building relationships...not collecting money from people.  If you build enough relationships and become enriched with friendship, your customers will gladly make you successful, both personally and financially.  When I see my customers on the street or in the grocery store, I get hugs and handshakes, and when I see  HS seniors that I've photographed, I get high fives and fist bumps.  I've laughed and cried in my office with my customers and when I go home at night I feel like the richest man in town, like George Bailey in the classic Christmas movie It's a Wonderful Life.

Comment

Business Portraits - The Right Way

Comment

Business Portraits - The Right Way

There are a few ways to take a great business portrait, and many ways to take a really bad one.  Business portraits, whether you are an executive, entrepreneur, speaker, author, or are unemployed, are often the first thing that people see, as social media sites have taken over both our personal (Facebook and Twitter) and professional (LinkedIn) lives.

Selfies are great...if you are in high school.  Candid photos at a party are great....to share with your friends.  But if you want your first impression to be of someone that people can trust to hire and want to do business with, a professionally-done business portrait will put you head-and-shoulders above most other people.  Choice of clothing, color of clothing, and the environment that you are in all come into play when planning and creating your portrait.

Whether it's a traditional head shot, or a more contemporary business portrait showing the environment you work in, it certainly pays to have it done well.  Leave the selfies and party photos for the weekend.

But don't take it from me.  A recent article in the Small Business Trends website written by CJ DiRoma implored readers to Say Cheese! 4 Reasons You Need a Business Photo Shoot.  

"Too often, businesses neglect making the most of their greatest commodity when it comes to creating content for marketing initiatives – its people. With social media driving brand awareness and social engagement strategies pushing new limits in brand loyalist campaigns, more and more businesses of all sizes are maximizing the faces that make their businesses unique, trustworthy, dependable, reliable and, overall, awesome."

To read more of the Small Business Trends article, go to: http://smallbiztrends.com/2014/11/business-photo-shoot.html


Comment

Luke Photography Studio Expansion

Comment

Luke Photography Studio Expansion

The Luke Photography studio expansion was finally finished in early August, but the workload has been too busy to share it with everyone until now.  Most of the high school yearbook deadlines have passed, although I have high school seniors at three different schools whose deadlines are this week, and we gotta get moving on them.

But I wanted to share a couple of photos of he expansion as it is.  There are a few things that have to be done to get it "tricked out" to maximize its use, and those activities will happen over the winter.

South wall showing expansive amounts of window light, and wall-to-wall neutral portrait background.

North wall, showing sandblasted brick wall


Comment

Ice Cream Photo Shoot, Fairport, NY

Comment

Ice Cream Photo Shoot, Fairport, NY

Last month I worked with Royal Cafe, a Fairport shop, to create some new marketing materials for their delicious, one-of-a-kind gelato dishes.  The owner of the shop, who also provides gelato for other establishments, makes a unique Spaghetti Gelato sundae that looks like a plate of pasta, but is full of delicious, creamy decadent gelato.  It has to be seen....and eaten...to be believed.

The spaghetti noodles are made with vanilla gelato, strawberry sauce is a perfect stand-in for tomato sauce, shaved white chocolate is perfect parmesan cheese, and brownies rolled into balls are a dead ringer for meatballs.

Comment

Kevin - Senior Pictures: Baseball Session On Location

Comment

Kevin - Senior Pictures: Baseball Session On Location

Kevin wanted the last part of his senior portrait session to take place at the Fairport High School baseball field, where he played last year on the varsity baseball team.  He was also an integral part of Fairport's state champion boys volleyball team.  

Here are some behind-the-scenes photos of Kevin's session, complete with some of the finished images.


Comment

Jake - Senior Pictures: Baseball Session On Location

2 Comments

Jake - Senior Pictures: Baseball Session On Location

Jake and his family traveled from North Carolina to Luke Photography for his senior portrait session. because they liked the way I photograph athletes.  The first part of Jake's session was done in the studio, but he's a big basketball and baseball player, so the last part of his session was done on a baseball field.  Here are some behind-the-scenes shots and final photos from this fun part of his session.

2 Comments

DIY Photo Umbrella Caddy

Comment

DIY Photo Umbrella Caddy

I have an assortment of light modifiers for my studio strobes and speedlights, including a variety of different-sized umbrellas.  Because more often than not they would end up on the floor in a pile that was just begging to be stepped on, I decided to bring by woodworking skills into play and build a caddy that would hold the umbrellas and other tall, thin equipment at the ready, while keeping them off the floor and away from clumsy feet.

I cut two pieces of plywood approximately 16 inches square, and glues them together at right angles using yellow wood glue.  If you want to strengthen the joint with angle brackets, you are more then welcome to do so.  I used rabbeted joints which prove to be very strong.

While the wood was drying, I cut 1.5" tall rings from a length of 3" PVC pipe.  I sanded all the edges of the PVC rings smooth using fine grit sandpaper.

Using special PVC cement designed specifically for use with this pipe, I glued all the rings together in the arrangement shown below and clamped them using a band clamp, which clamped all the pieces together at one time.

Let the PVC stay clamped according to the directions on the cement container.  When the cement had fully set, I sprayed the rings with a couple of light coats of white spray paint, to cover the mess that the purple PVC cement had left behind.

When the wood was fully dried, I sanded it with fine grit sandpaper and stained it, then covered it with several coats of polyurethane.  Because I never do things only half-way, I used 2 coats of cherry stain, and 4 coats of polyurethane, lightly sanding between coats to give it a very smooth finish.  Does this matter?  No.  But it's a curse that I make myself do things like this.

When the polyurethane was dry, I attached the set of rings to the vertical piece of plywood using screws and nuts, with washers on the back side.

When in use, the caddy keeps umbrellas, monopods, and any other tall, thin equipment out of the way and standing at the ready, whenever they are in need.


Comment

Loryn - Senior Pictures - Fairport Class of 2015

Comment

Loryn - Senior Pictures - Fairport Class of 2015

Loryn was a member of Fairport's varsity softball team as a sophomore when I photographed the team and thought she would be a great Model Rep. for the studio this year.  I certainly hit the mark on this one.  Loryn is fun and has a bubbly personality, and I really enjoyed her session.   Not only is she cute and smart, but has that sense of humor as a kicker. 

Here is the layout of her Model Rep. album, which is showing around to her classmates.  She also has gift cards which will entitle whoever brings one in to a session to 20% off a senior portrait session.  If you know Loryn, get a card from her.

Comment

Alina - Senior Pictures - Fairport HS Class of 2015

Comment

Alina - Senior Pictures - Fairport HS Class of 2015

Alina had one of the most fashion-conscious sessions I've had in a long time.  As a small child, she used to model for Kodak for marketing materials.  She may or may not remember it, but she certainly subconsciously recalls those sessions and brought all that memory back during her senior portrait session here in my Fairport studio.

Alina is one of the studio's Model Representatives from Fairport High School. This is her Art Book, which she will be sharing with her friends and passing out Gift Cards so her friends and classmates can get discount portrait sessions.

Which image is your favorite?

Comment

Samantha - Senior Pictures, Fairport Class of 2015

Comment

Samantha - Senior Pictures, Fairport Class of 2015

I first photographed Samantha during a family portrait session about 4 years years ago, and thought at that time that she'd be a great Model Rep. for the studio. She had a quiet grace and confidence about her that I thought was very real, it was not put on or fake.  As most of my photo sessions are, her Model Rep. session was unique to her and the mood of the session really took on the character of the person involved.  She proved even more confident than I had expected, and I think that really shows up in her senior pictures.

Which is your favorite image?

Comment

1 Comment

Light Stand Wheeled Dolly

Universal Light Stand Dolly

I needed wheels on the light stands in my studio, to make moving them around easier and quicker.  A friend gave me a set of casters that fit over the legs of the light stands, and I thought I was in business.  However, I found that the tube part of the casters did not fit the legs of my light stands.  I soon discovered that the diameter of the legs on all of the light stands in my studio were not equal....different manufacturers used different sized tubing for the legs of their stands, which set me off on a mission to create a rolling dolly base that would fit all my light stands, regardless of the diameter of the legs.

Ingredients:

Nine lengths of 3/4 inch plywood, cut into 2.5 inch strips
Metal strapping
Foam sheets
Three casters

Design

I planned a design using 3/4 inch plywood, which is plentiful in my woodshop.  I first cut the plywood into 2.5 inch strips.  I needed nine individual pieces, which I cut into the following lengths:

            three that were 22 inches long;

            six that were 19 inches long

Round the corners of one end of each of the 22” pieces.

Glue up the three sets so that the 22” length is on top of one leg section, in the middle of the 2nd section, and on the bottom of the 3rd section.  When you glue up each set, make sure that the squared ends are aligned, and that the rounded end of each 22 inch piece extends beyond the ends of each of the 19 inch pieces.


Leg 1   22 inch top layer

      19 inch middle layer

      19 inch bottom layer


Leg 2   19 inch top layer

      22 inch middle layer

      19 inch bottom layer


Leg 3   19 inch top layer

      19 inch middle layer

      22 inch bottom layer

Universal Light Stand Dolly - Joint Detail

Universal Light Stand Dolly  - detail of joint

Assembly

When the glue has dried, lay out the leg sections together, so that the rounded ends are towards the center, and the square ends radiate out from the center.  Make sure the rounded ends are overlapping appropriately, then drill a hole through the middle of the rounded over ends, to accept a 3” bolt that ties them all together.

I sanded all the wooden surfaces, then primed and painted them.  To keep the light stand legs tight to the dolly, I used strips of metal strapping that can be found in the plumbing aisle of most big box hardware stores.  I attached a piece of foam to each piece of strapping, then screwed them to the squared off end of each leg, making a stirrup.  The foam is merely to prevent scraping the paint off the legs of the light stand and ensure a more secure fit.  Attach one caster to the bottom of each leg, directly under the location where the light stand leg will fit in the stirrup.

Universal Light Stand Dolly - caster and stirrup detail

Once each leg of the dolly is complete, attached the rounded ends of the dolly with a 3 inch bolt, careful to put a large washer both above and below the contact points with the wooden legs.  Do not over-tighten the bolt, as you may need to adjust the angle of each leg as you set the light stand on it, to ensure that each leg is 120 degrees from the adjacent legs.

Installation

Once finished, set the light stand on the dolly, spreading the legs of the light stand so that each on engages a stirrup at the end of each dolly leg.  When in place, tighten the knob on the light stand, locking the legs in place.  You should be able to lift the light stand and the dolly should move with it, if the stirrups are correctly positioned and the light stand legs are properly in place.

The beauty of this design is that it should fit any light stand that I have in the studio, and the weight of the light stand (and anything on it) is transferred down the legs of the light stand and directly to the casters...there should be no weight on the center of the dolly.

Universal Light Stand Dolly

1 Comment

Maddie - Senior Pictures, Fairport Class of 2015

Comment

Maddie - Senior Pictures, Fairport Class of 2015

Maddie's older sister came to the studio two years ago for her senior pictures, and I had her pegged then as a freshman as a Model Rep. for this year.  Maddie is an outgoing, talkative and friendly girl who plays lacrosse and is well-liked by many of her classmates. At least, that's what they have all told me.  :-)

I knew right away that Maddie's blue eyes are her most prominent feature, and that became very apparent during her session.  She had a lot of range during the session, and was able to pull off a lot of different looks very easily.  If you know Maddie, make sure to ask her for Gift Cards to the studio for your senior portrait session.

Comment

Carlie - Senior Pictures, Fairport Class of 2015

1 Comment

Carlie - Senior Pictures, Fairport Class of 2015

Carlie is one of my Senior Portrait Model Reps. from Fairport HS this year.  She is the middle of three kids, and is a typical 2nd child:  talkative, funny, outgoing.  She obviously had fun taking her senior pictures and has all the characteristics of a perfect ambassador for the studio: she is very comfortable with herself, like to laugh and be a little goofy, and is well-liked by classmates.  I couldn't have picked a better Model Rep.!  Here is the Art Book that she received the she'll be showing off to her friends to show them how fun sessions can be at Luke Photography and great her photos turned out.

1 Comment

Comment

New Web Site for Luke Photography

Portraits of high school seniors, commercial and industrial photography, and business portraits

Portraits of high school seniors, commercial and industrial photography, and business portraits

After several years of using my most recent design for my Luke Photography web site, I decided to make a switch to a more responsive web design that is easier viewed on smaller screens such as tablets and smart phones.  That, and I needed a fresher look and feel to the web site which showcased the best part of the business: the photos.

The large majority of the work I do is HS senior portraits, and if you look at most high school seniors nowadays, you mostly see the top of their head, because they are all looking down at their phones.  Based on the old saying "if you can't beat them, join them", instead of trying to get them to look up at me, I made sure my web site looked good where they were looking at it....on their phones.

Comment

3 Comments

Photography Background: DIY Crackle Paint

Here at Luke Photography, it is time to start building new sets and painting new backgrounds for the upcoming senior portrait season.  This year, I've decided to add a few new grungy backgrounds to the options that I have for senior pictures.  One background is authentically weathered and beaten down, the other had to appear that way.

I visited a salvage yard that sells old architectural parts that are taken from buildings that are slated for demolition or major renovation, and purchased couple of pairs of old exterior shutters that are 8 feet tall. Years of sun exposure and weather have cracked, peeled and faded the paint, and they had a beautiful patina on them.  All it took was a wire brush to scrape off the loose paint, and they were good to go.

I acquired five fiberglass interior doors in the past 6 months.  Didn't pay a dime for them.  Three were being thrown out, and I rescued them before they hit the dumpster. The last two doors were near the curb in my neighborhood on trash day.  Score.  Now I had to make them look as old as the shutters, without waiting 80 years.  Yeah, I'm a little impatient.

Scouring the internet, I came across a DIY chalk paint recipe and crackle painting technique that I used to apparently speed up the aging process of these doors.  Because I had five doors, I had ten sides that I could paint.  I decided to paint one side of the door a light color and the other side a darker color, so I had a lot of options once the doors were done.

The paint itself is just latex house paint.  I have numerous cans of leftover paint from home projects that I used, and my studio landlord offered a few more colors that I found interesting.

Chalk paint was used around the turn of the century and had limestone in it to make it durable.  To make the DIY chalk paint recipe, I mixed 1/3 cup of water and 1/3 cup of plaster of paris in a cup to make a water slurry.  This then gets mixed into 1 cup of paint.  You can't store or re-use this paint mixture, so only mix what you'll use for one coat, and mix it just before you are going to use it. This 1 1/3 cup of DIY chalk paint is reportedly more than enough to paint a dresser, so I cut back the recipe by half, so I didn't throw as much out after only painting one side of a door.

The key to a good crackle finish is to have highly contrasting colors of paint on the door so that the cracks in the paint really show up well..  If you want a finished door with a light color, a very dark color has to be the base coat, and if your finished door is going to be a dark color, the base color has to be a very light color.  For the darker colored doors, I just used white primer paint as my base coat, and for the lighter colored doors, my base coat was black, or very dark grey or brown.

Applying base coat for a light-colored door

Applying base coat for a light-colored door

Finished base coat for light-colored door

Finished base coat for light-colored door

Once the base coat on the door dry, then I was ready to start the crackle paint technique.  On top of the dry base coat I painted each door with a coat of white glue.  I bought a 1-gallon container of Elmer's glue from my local art supply store, and will probably use at least half of it for the 10 door sides.  The second (top) coat has to be painted when the glue is tacky and starting to dry.  The glue coat has to be fairly thick, otherwise it will dry too quickly, and you will have lost the window of opportunity to apply the top paint coat and get the crackle finish. A thicker coat of glue also results in larger cracks in the top coat of paint when it is dry.

Starting the glue coat

Starting the glue coat

Finished coat of glue

Finished coat of glue

When the glue started to set up and was tacky, I started painting the top coat of DIY chalk paint on the door.  I painted in the same sequence that I painted the glue on, so that the glue was in the same state of dryness as the top coat was applied.  The top coat has to dry for several hours.  Once it was dry, I rubbed a light coat of dark wood stain over the entire door, which helped it to look old and dirty.

Starting the top paint coat

Starting the top paint coat

Top coat almost finished

Top coat almost finished

Glue and top paint coat starting to dry

Glue and top paint coat starting to dry

Applying wood stain

Applying wood stain

Before and after

Before and after

Detail of finished door

Detail of finished door

Several finished doors

Several finished doors

Miley, my studio companion with the new "old" doors

Miley, my studio companion with the new "old" doors

3 Comments

3 Comments

Attention Amateur Photographers: It's Not About the Camera


I was photographing my local high school hockey team last night and there was a father of a player on the opposing team alongside me.  As photographers secretly always do, we were both sneaking peeks at the other's choice of camera and lenses.  He had a high-end Canon camera and lens, both of which are often seen in the hands of professionals.  He held the camera dearly, shooting and immediately checking the results on the camera's LCD screen, and seemed genuinely interested in why I was just standing there calmly watching the teams warm up, my camera snuggled in my bag.  Surely I couldn't know what I was doing.

During the player introductions, I pulled the camera out, took one test shot, and stood at attention during the national anthem, while he was still shooting and frowning at the results.  Once the game was about to begin, we exchanged pleasantries, and that's when the chat-fest began.  He was having trouble getting good color rendition, exposure, and asked me what I was doing.  I explained that I had previously set a custom white balance for the ice rink so that my colors were perfect, and I know the light levels in the rink, so that my exposures were always consistent.


He went on to explain that he had upgrade to this high-end Canon camera, then was upset at Canon because the lens he had been using didn't work on the camera, and he had to invest in a new professional lens.  I asked him why he felt he had to upgrade the camera in the first place.  He mumbled something about needing better photos.  I wasn't really listening because I was actually photographing the game, while he was talking about photographing the game.  I then listened to him explain...in vivid detail...about his camera purchases over the last couple of years, and was really upset that his photos were not getting any better.  He asked me what camera I was shooting, and how come I only took one shot before starting to photograph the game.

After I told him what camera I had, and how I knew exactly what I needed to do to get good photos, he drifted off, intently studying the LCD on the back of the camera to figure out what he was doing.  I'm not sure, but I really don't remember even hearing his shutter clicking at all while I was standing next to him.

As I walked away, all I could do was think about the interaction and how it has become so commonplace among amateur photographers with deep wallets.  I should have suggested that he save half of the $10,000 he spent to feed his hobby and get some lessons and go to some seminars to learn how to be a better photographer.

I have never had a camera tell me what direction the light was coming from.
I have never had a camera tell me how the light was striking my subject.
I have never had a camera tell me how to frame my subject in the viewfinder.
I have never had a camera tell me when to press the shutter to capture the best moment.

The smartest cameras on the planet will try to automatically focus on something in the viewfinder.
The smartest cameras on the planet will give you a good exposure for a neutral grey.
That's all.
The rest is up to you.

3 Comments

Comment

Speaking Engagement at Photo Northeast 2014

I will be returning to the Photo Northeast convention in Woodcliff Lake, NJ as a speaker again in 2014.  I was asked to present my program "Sports Portraits With an Edge" on how I create unique and dynamic sports portraits.

I have gotten quite a following among both photographers and high school athletes for the interesting images I create, while trying to make these 17 year old kids look like professional athletes.

Link to Speaker Page

I last spoke at Photo Northeast in 2011 when I presented my very popular "Big Budget Results with Low Budget Equipment".


Comment

Comment

Photographing Sports in the Rain


 Luke Photography, sports photos in rain

I like to support the local high school's athletes, especially those who've come through the studio for senior portraits, by taking photos during their games.  In the fall and spring seasons, there are many times here in the Rochester, NY area when it is raining, and I needed a way to keep myself and camera dry while photographing sports games without going out any buying expensive rain gear for myself and the camera. Holding an umbrella while you are photographing anything is a lesson in futility, so I needed a hands-free umbrella option, using items I already had.

Luke Photography, sports photos in rain
I needed a way to hold the umbrella in place over my head, without holding it.  If you've ever watched flag bearers marching during a parade, you've seen the belt-type apparatus that the end of the flag sits in while they're marching.  I needed this, and then something to hold the umbrella further up the shaft, to ensure that it stayed upright during use.


I dug out a PCV structural fitting from a past project (DIY light table) and dug out a nylon strap used to mount my kayak to my car.  I cut slots in the PVC fitting so I could thread the nylon strap through and create a base that the butt end of the umbrella could sit in.


Luke Photography, sports photos in rain


I threaded the fitting onto the strap, then cinched the nylon strap around my waist.  The foam-covered handle on my golf umbrella fits snugly into the fitting, and then I wrap the strap around my upper torso, wrapping it around the shaft of the umbrella high enough to prevent it from sliding sideways, and then tie off the loose end of the strap.


Luke Photography, sports photos in rain

I'd like make a more permanent solution, with a quick release fitting to clamp onto the umbrella shaft to speed up the assembly/disassembly.  But, for the amount of times that i'm actually out in the rain photographing sports, this seems to work just fine....and even gets some interesting looks and comments from the waterlogged fans as I walk by them.  My favorite comment: "This isn't your first rodeo, is it?"

Luke Photography, sports photos in rain

Comment