Viewing entries in
"techniques"

Comment

Digital Photo Restoration


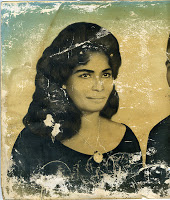
A client that I had done portraits for two years ago came to me with a beat up photographic print of his wife's parents that they wanted restored.  It was the only print of this photograph that the family had, and it was a treasured heirloom.  They were from South America, and although the print only was estimated at 50 years old, it was hand-colored, textured, black and white print.  They wanted the retouched print to be as close to the original as possible.

The print had various amounts of surface damage, but had no major tears or missing pieces, which significantly increases the level of difficulty during restoration.  But because the print measured at least 11x14 inches, it was also too big to be scanned all in one piece, so that notched the level of difficulty right back up there.


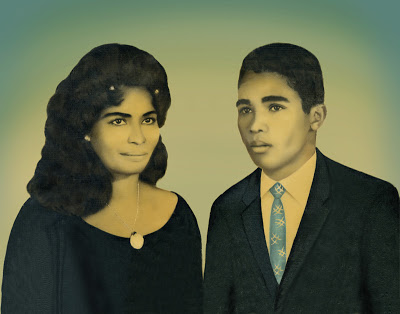
I had to scan each half of the print separately, then combine the two halves together, making sure to match the colors, and then blend in the seam down the center of the images.  Because the faces of the couple were the most important part of this image, I chose to work on those areas first.  Using both the patch tool and the clone tool in Photoshop allowed me to bring back the details in the faces.  The patch tool proved to be invaluable, as I had to retain the texture that was inherent in the print.


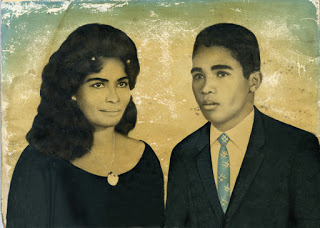
Once the faces and bodies were completed, I chose to strip the subjects out of the damaged background, create a new background, and then drop them on the newly created background.  I determined this to be a faster and more efficient method, as trying to patch and clone the background would have taken too long, and never would have produced as clean a result as simply creating a new matching background.


The finished print far exceeded the client's expectations.  So much so, that they ordered extra copies of the print for the remainder of the family.  Now they all have copies of this family heirloom, which hopefully will last 75-100 years, with today's paper and printing technology.


Comment

Comment

Photographing Beer


I recently started photographing various trademark beers for Fairport Brewing Company, a local microbrewery.  Although all the foods and beverages that you see in magazine and television advertisements look deliciously steamy hot or refreshingly cold, nothing could be further from the truth.  There is an art to making month-old, cold hamburgers look lip-smackingly good.  And in this post, I’ll show you what makes you want to dive into room temperature, flat beer.

With the exception of some English beers that are preferable served less than cold, most beer is served cold, so that is what advertisers want you to see and crave.  But again, what you see is rarely what it really is.


“Hero” Shot


Frosted with aerosol deoderant

To get this photo of one of this brewery’s IPA’s, I started with one of their signature logo glasses.  To make the beer seem like it sitting in a frosty glass, I masked off the very top of the glass with a piece of paper, then lightly sprayed the rest of the glass with the cheapest aerosol deodorant that I could find at my local supermarket.  You really want to “cheap out” here, because the more expensive brands go on clear, and you want the frost.  A side benefit is that the studio smelled spring fresh after each and every spray.
Glycerine and water

Next step is to spray the frosted area of the glass with a 50/50 water and glycerine mix.  You can find glycerine in your local pharmacy…it’s in the “constipation” aisle…so don’t spend a lot of time there browsing.

The glass is then placed in the lighting set-up, which included one overhead light in a gridded soft box and two side lights, each in a gridded strip box.  These side lights were placed slightly behind the glass to add to the rim light effect of the glass and show off the water droplets.

Cardboard reflector
The trouble with this lighting set-up is that there is not a lot of light going through the glass, and not matter what kind of beer you are photographing, it’s going to look dark and cloudy…and very unappetizing.  The trick is to take a cardboard cutout similar to the shape of the glass and angle it directly behind the glass, so that it won’t show from the camera’s angle.  This cardboard will reflect the light from the overhead soft box, and send it shooting through the glass, instantly elevating the status of the beer from dark and cloudy to refreshingly delicious.  Hard to remember that it’s still warm and flat.  And speaking of flat, when you are ready to photograph the beer, drop some salt in the glass.  This will produce bubbles and bring back the head of the beer.
Hero shot lighting setup

As an alternative to shooting against a dark background, I also replaced the dark background with a large soft box, and adjusted the light in it to give me a nice white background.  This produces a lot of light coming through the beer and avoids the dark, cloudy look altogether.


“Pour" Shot


I took an empty beer bottle (I had several to choose from at home) and using a glass cutter purchased from my local big box hardware store, cut off the bottom of the bottle and sanded the edges to they were smooth and would not cut my tender fingers..  I then clamped the bottomless bottle of beer…which is the ultimate fantasy….to a light stand.  Doing this allowed me to place the glass and the bottle in exactly the same position for each and every shot, and I simply just pour a cup of beer into the open part of the bottle while firing the camera. 


The logo on the glass did not show up well against the dark background in the first several shots, so I added a small snooted flash directed at the background, directly behind where the logo would appear in the photo.

Again, flat beer works best in this kind of photo.  Otherwise, all you’ll be taking a photograph of is foam on the bottom of the glass, which is less tasty than the amber-colored goodness of grain,  hops and yeast.


Comment