Viewing entries tagged
DIY

DIY Continuous Light Adapter for 4'x6' Soft Box

Comment

DIY Continuous Light Adapter for 4'x6' Soft Box

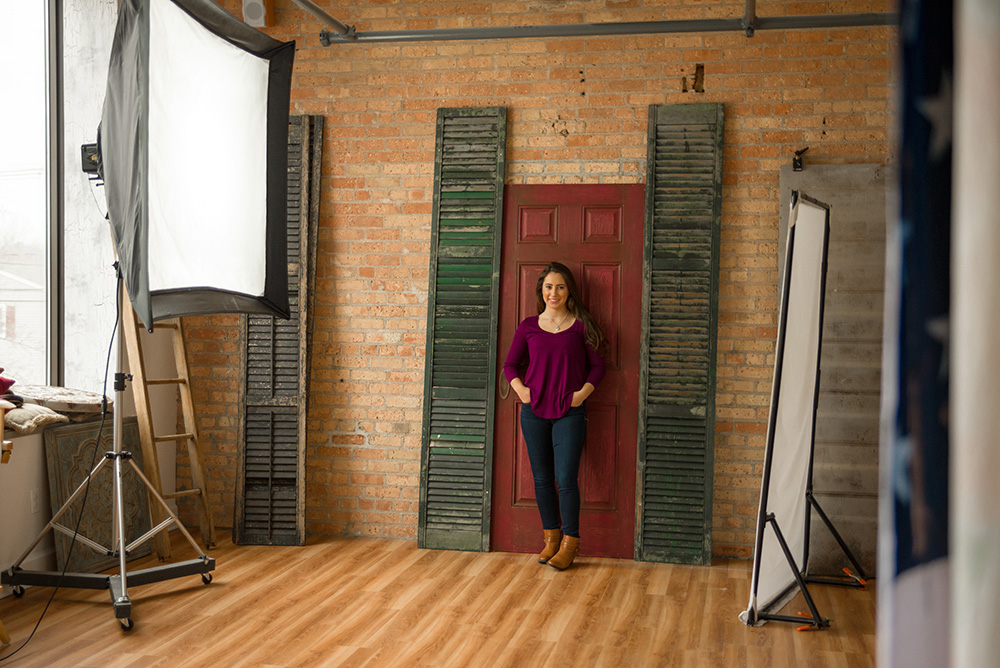
One of the camera rooms at the Luke Photography studio is a 700 sq.ft. daylight-lit room on the 2nd floor of the building with five 7 ft. tall windows along one wall (west-facing).  On a normal day, the light in this room is perfect for portraits...very soft, but directional, and I get great exposures shooting at 800 ISO, f2.8 at approximately 1/400th of a second (on average).  However, on darker cloudy days, there is at least a two to three stop difference in the light....enough so that I am not happy with the settings I have to use to get a proper exposure.

I have another camera room that is outfitted with strobes, and that is where I prefer to keep them, and I prefer to shoot natural daylight in this 2nd camera room.  I have a Larson 4 ft. x 6 ft. soft box permanently attached to a DIY rolling base in the daylight camera room, but I'd prefer to shoot continuous light instead of strobe, so I needed a continuous light source, but I didn't want another piece of equipment in the room, so I decided to make a continuous light adapter to fit inside the 4 ft. x 6 ft. soft box, without affecting its ability to be outfitted with a strobe simultaneously.

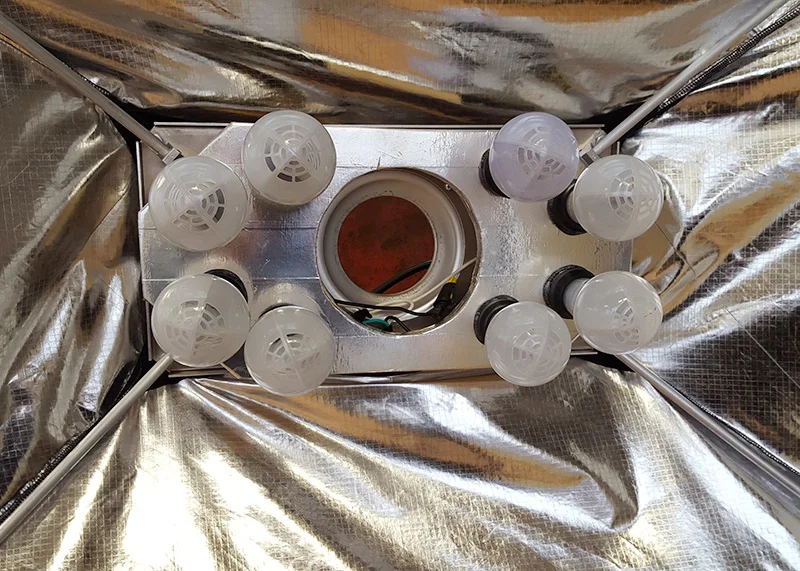
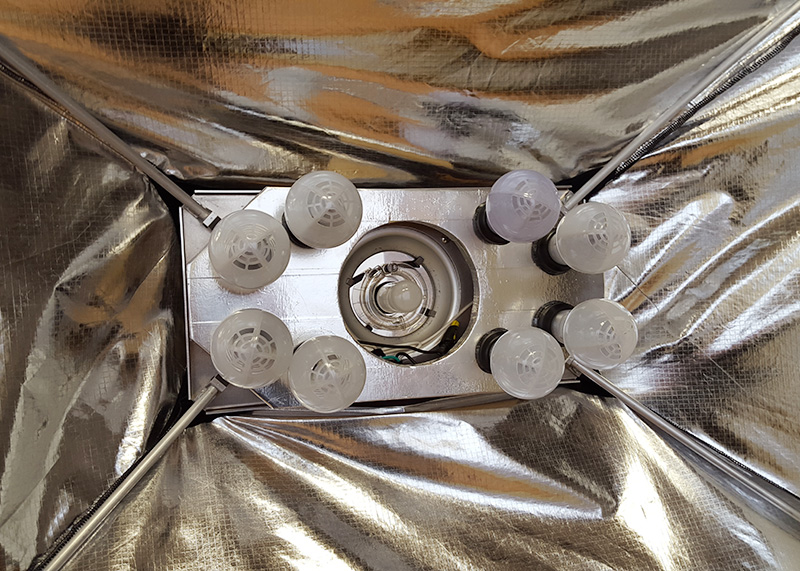
I designed a hexagonal plate made out of 3/4" thick plywood that could be securely attached to the base plate of the soft box, with a hole in the middle that would allow the strobe to be attached and used without affecting the quality of light.  I drilled eight large holes that would accept rubberized light bulb sockets (purchased at the local big box hardware-home goods emporium).  I glued pieces of plywood to the back side of the wooden base plate so that it would sit approximately one-and-a-half inches away from the metal base plate to allow room for the wiring. The frontward-facing side of the wooden base plate was covered with aluminum tape, so that it had a reflective surface and would bounce any light forward.

The rubberized light sockets were epoxied into the holes and allowed to dry.  The light sockets were all wired together in series.  I purchased a 6 ft. extension cord with male and female ends that matched the cords used by the Alien Bees strobes I already use in the studio.  The male end of the extension cord was cut off, and the cut end was wired to the rubberized light sockets, so that the female end hung free and would be used to connect to the strobe power cords that get plugged into the power source.

The light was provided by 60 watt LED bulbs that are rated at 5000K.  The Cree bulbs that I purchased had a fairly high color rendering index (CRI) which indicates that it produces more full-spectrum light.  Bulbs with low CRI only provide light from a few areas on the ROYGBIV spectrum, and while the light may still look white to our eyes, the fact that it uses light from only a few areas on the spectrum will result in spotty and often very poor skin tones.  I did not need to buy the strongest wattage bulbs I could find.  I only needed bulbs that would get me back to my preferred natural day light exposure and make up the 2 or 3 stops of light that was lost on a cloudy day.

After the wooden plate was screwed to the metal base plate and the soft box was assembled, the bulbs are screwed into the light sockets, and front diffusion screens are re-applied to the soft box.  Once the strobe is re-attached to the metal base plate of the soft box, the strobe and continuous light adapter can be used independently of each other.  If I need to use the strobe, the power cord is attached to the strobe.  If I want to use continuous light, I power down the strobe, unplug the power cord, and plug it into the female adapter for the continuous light source.

Total cost for the project was less than $100 USD, and most of that budget was eaten up by the LED bulbs.  I already had the wood, aluminum tape, and wiring, so the only other purchase was the rubberized light sockets and the extension cord.

The continuous light is all but identical to the light provided by the strobe in the soft box.  I created a custom white balance for the continuous light adapter using the Passport Color Checker, so if there are any disparities in the white balance and color spectrum, they are normalized.  Now whether I am shooting in this room using natural ambient light coming through the windows or using the continuous light adapter on a particularly cloudy day, the camera settings are identical, without the need for any other equipment on the floor.

Comment

DIY Faux Rusty Industrial Wall Background

1 Comment

DIY Faux Rusty Industrial Wall Background

My studio in Fairport, NY needed a new "gritty" background to use for high school senior pictures. Because my mantra is making my senior pictures look different than everyone else's, I didn't want to buy a background that anyone can buy...I wanted to make my own unique background that would make an impression.  With a little of DIY construction and faux painting, the studio now has a background that is one-of-a-kind and will look great behind a senior boy who wants a certain kind of "look".

Many of my backgrounds start out as a 4 ft. x 8 ft. sheet of 1/4 in. plywood, which I'll cut down to 4 ft. x 6 ft.  Two grommets are added to one of the short sides and one of the long sides so that the background can be hung in both orientations.  Once each side of the plywood is primed, each side can be individually painted for different backgrounds.  If both sides are not primed, they will absorb moisture differently and the plywood will warp over time. 

This particular background has a rusty industrial wall on one side and distressed leather on the other (a follow up blog post).  For the faux industrial wall, I painted the base color on the background, which consisted of a medium-toned gray.  I then painted "rusty" seams on the plywood, breaking it up into smaller panels.  The seams consisted of layers of dark gray, brown, orange-brown and yellow-orange to replicate rusted edges of metal.  I then spot painted streaks of lighter colored grey paint mixed with yellows and greens to add the streaky aged areas.  After that I masked off a panel and sponged on some green-yellow-gray paint to simulate aged mold and distress.

Hand-painting a photography backdrop with a faux rusty steel industrial finish....base coat.

Once the aging of the metals was complete, I added the rust on the entire background by lightly adding a watered down mix of orange and brown using a spray bottle, spraying lightly in different areas, and then lightly blotting the wet paint immediately afterwards with a paper towel.  The paint was allowed to run and drip in a few areas, but I was looking for a mottled rusty color over parts of the background.

Hand-painting a photography backdrop with a faux rusty steel industrial finish....adding rust.

The rivets were adding using the end of the handle of a foam paint brush dipped in light gray paint (lighter in color than the base coat).  A crescent-shaped highlight of very light grey paint and a crescent-shaped shadow of dark gray paint was painted was added on each rivet to give it a 3-dimensional look.  Another layer or two of rust was sprayed on after the rivets were added.

Hand-painting a photography backdrop with a faux rusty steel industrial finish...adding rivets.


I had previously made gears from 1 in. thick foam insulation and painted them to look rusty.  The foam was cut using a DIY hot knife, which consists of a heated wire which cuts through the foam like a hot knife through butter.  I will show the hot knife in a later blog post, but there are multitudes of examples show on YouTube.  The foam gears were hot glued onto the background, leaving space in the center for the subject of the photographs.  I added a little extra dimension by adding a foam block behind one of the gears to raise it off the background, which results in more of a shadow when the background is lit.

FauxRustyIndustrialWall

The background most likely will be lit with a hard, directional spot light as shown in the example, in which I stepped in front of the camera for my assistant.  It shows a harder more dramatic light on both subject and background, which enhances the mood and look of the gritty, industrial portrait.

1 Comment

Comment

DIY Vintage Telescope

Telescope_06.jpg

This is a DIY tutorial on changing the appearance of a 40-year old telescope into a vintage-looking 400-year old telescope of tarnished brass.  

Bushnell telescope - the "before"

This telescope had been in my parent's basement for 30 years. It was an inexpensive 1970's era Bushnell telescope that was purchased at a garage sale for a couple of dollars in the late 1970s.  As I am prone to do, when my parents were throwing it away a couple of years ago, I said, "I'll take it....I can make something out of it."

It took a couple of years until I started, but I just finished it and it looks exactly how I had imagined it.  Upon close inspection, it won't be mistaken for a museum piece, but for the studio, it certainly fits the bill.

Disaswembled telescope

After disassembling the entire telescope, I used gold leafing to cover the telescope tube and any other parts that were larger in size.  Follow the manufacturer's directions for the leafing that you use. And don't go cheap on the adhesive....use the adhesive sizing recommended for the gold leaf.

Gold leafing

For the smaller parts, I used craft paint in a couple of colors that resembled tarnished brass.  Don't be too careful while painting the smaller parts, I ended up dabbing the paint on with a large paint brush....you are not going for a clean look on these pieces.

Gold paint

When all the pieces were covered, I sprayed anything that was covered in gold leaf with a spray polyurethane in a matte finish.  This protects the leafing from handling. The gold leaf is somewhat fragile even after dry and can get scraped off easily.  Use a matte finish spray, because tarnished brash does not have a glossy look.


Telescope_05.jpg

For the aging and distressing of the pieces, I used brown paint mixed with an extender that both thins the paint and retards the drying process.  I applied the thinned paint with a damp paper towel, dabbing it onto the parts of the telescope that I wanted to look older.  Don't apply too much paint at once...it pays to be patient and layer the paint on until you get the look you want.

Above you can see the start of the application of the brown paint on the main tube of the telescope, compared to the shiny gold-leafed lens barrel that has not been aged yet.

Before and After

Comment

DIY Photo Umbrella Caddy

Comment

DIY Photo Umbrella Caddy

I have an assortment of light modifiers for my studio strobes and speedlights, including a variety of different-sized umbrellas.  Because more often than not they would end up on the floor in a pile that was just begging to be stepped on, I decided to bring by woodworking skills into play and build a caddy that would hold the umbrellas and other tall, thin equipment at the ready, while keeping them off the floor and away from clumsy feet.

I cut two pieces of plywood approximately 16 inches square, and glues them together at right angles using yellow wood glue.  If you want to strengthen the joint with angle brackets, you are more then welcome to do so.  I used rabbeted joints which prove to be very strong.

While the wood was drying, I cut 1.5" tall rings from a length of 3" PVC pipe.  I sanded all the edges of the PVC rings smooth using fine grit sandpaper.

Using special PVC cement designed specifically for use with this pipe, I glued all the rings together in the arrangement shown below and clamped them using a band clamp, which clamped all the pieces together at one time.

Let the PVC stay clamped according to the directions on the cement container.  When the cement had fully set, I sprayed the rings with a couple of light coats of white spray paint, to cover the mess that the purple PVC cement had left behind.

When the wood was fully dried, I sanded it with fine grit sandpaper and stained it, then covered it with several coats of polyurethane.  Because I never do things only half-way, I used 2 coats of cherry stain, and 4 coats of polyurethane, lightly sanding between coats to give it a very smooth finish.  Does this matter?  No.  But it's a curse that I make myself do things like this.

When the polyurethane was dry, I attached the set of rings to the vertical piece of plywood using screws and nuts, with washers on the back side.

When in use, the caddy keeps umbrellas, monopods, and any other tall, thin equipment out of the way and standing at the ready, whenever they are in need.


Comment

1 Comment

Light Stand Wheeled Dolly

Universal Light Stand Dolly

I needed wheels on the light stands in my studio, to make moving them around easier and quicker.  A friend gave me a set of casters that fit over the legs of the light stands, and I thought I was in business.  However, I found that the tube part of the casters did not fit the legs of my light stands.  I soon discovered that the diameter of the legs on all of the light stands in my studio were not equal....different manufacturers used different sized tubing for the legs of their stands, which set me off on a mission to create a rolling dolly base that would fit all my light stands, regardless of the diameter of the legs.

Ingredients:

Nine lengths of 3/4 inch plywood, cut into 2.5 inch strips
Metal strapping
Foam sheets
Three casters

Design

I planned a design using 3/4 inch plywood, which is plentiful in my woodshop.  I first cut the plywood into 2.5 inch strips.  I needed nine individual pieces, which I cut into the following lengths:

            three that were 22 inches long;

            six that were 19 inches long

Round the corners of one end of each of the 22” pieces.

Glue up the three sets so that the 22” length is on top of one leg section, in the middle of the 2nd section, and on the bottom of the 3rd section.  When you glue up each set, make sure that the squared ends are aligned, and that the rounded end of each 22 inch piece extends beyond the ends of each of the 19 inch pieces.


Leg 1   22 inch top layer

      19 inch middle layer

      19 inch bottom layer


Leg 2   19 inch top layer

      22 inch middle layer

      19 inch bottom layer


Leg 3   19 inch top layer

      19 inch middle layer

      22 inch bottom layer

Universal Light Stand Dolly - Joint Detail

Universal Light Stand Dolly  - detail of joint

Assembly

When the glue has dried, lay out the leg sections together, so that the rounded ends are towards the center, and the square ends radiate out from the center.  Make sure the rounded ends are overlapping appropriately, then drill a hole through the middle of the rounded over ends, to accept a 3” bolt that ties them all together.

I sanded all the wooden surfaces, then primed and painted them.  To keep the light stand legs tight to the dolly, I used strips of metal strapping that can be found in the plumbing aisle of most big box hardware stores.  I attached a piece of foam to each piece of strapping, then screwed them to the squared off end of each leg, making a stirrup.  The foam is merely to prevent scraping the paint off the legs of the light stand and ensure a more secure fit.  Attach one caster to the bottom of each leg, directly under the location where the light stand leg will fit in the stirrup.

Universal Light Stand Dolly - caster and stirrup detail

Once each leg of the dolly is complete, attached the rounded ends of the dolly with a 3 inch bolt, careful to put a large washer both above and below the contact points with the wooden legs.  Do not over-tighten the bolt, as you may need to adjust the angle of each leg as you set the light stand on it, to ensure that each leg is 120 degrees from the adjacent legs.

Installation

Once finished, set the light stand on the dolly, spreading the legs of the light stand so that each on engages a stirrup at the end of each dolly leg.  When in place, tighten the knob on the light stand, locking the legs in place.  You should be able to lift the light stand and the dolly should move with it, if the stirrups are correctly positioned and the light stand legs are properly in place.

The beauty of this design is that it should fit any light stand that I have in the studio, and the weight of the light stand (and anything on it) is transferred down the legs of the light stand and directly to the casters...there should be no weight on the center of the dolly.

Universal Light Stand Dolly

1 Comment